Wiggly-Jiggly Fun: Rediscover Classic Jello Mold Recipes
Step into a world where desserts are not just delicious but also dazzle with vibrant colors and delightful textures! For generations, the humble gelatin dessert has transformed into magnificent, wiggly-jiggly creations known as Jello molds. Whether you're planning a festive celebration, looking for a unique family treat, or simply yearning for a taste of nostalgia, rediscovering the magic of a classic jello mold recipe is an adventure in itself. Forget the notion that these delightful desserts are a relic of the past; they are making a triumphant return, bringing smiles and sparking conversations at any table.
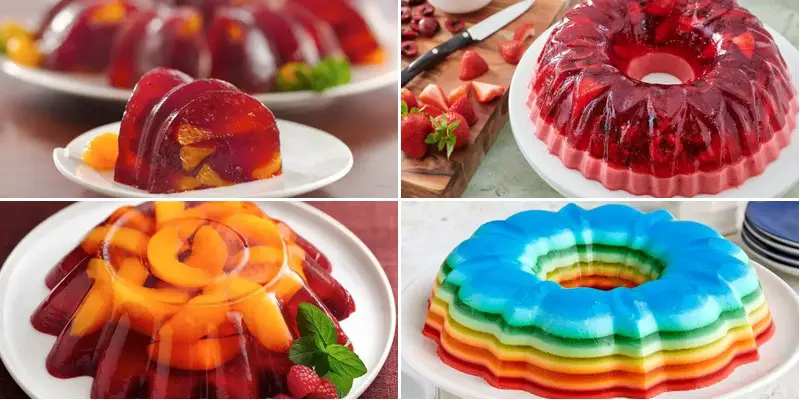
From towering, multi-layered masterpieces to creamy, fruit-infused wonders, Jello molds offer a playful canvas for culinary creativity. They are surprisingly versatile, adaptable to countless flavors and occasions, and undeniably captivating. Get ready to dive into the art of creating these colorful, bouncy treats that promise to be as fun to make as they are to eat!
The Enduring Charm of Jello Molds: More Than Just a Dessert
While some might relegate them to the archives of "retro" entertaining, Jello molds possess an undeniable, enduring charm. They stand out on a dessert table, catching the light and drawing attention with their glossy surfaces and translucent hues. Unlike traditional cakes or pies, a beautifully crafted jello mold recipe offers a unique sensory experience – the gentle wobble, the smooth texture, and the burst of fresh, fruity flavor. They evoke a sense of childhood wonder, bringing a touch of whimsical nostalgia that appeals to both kids and adults alike.
These aren't just desserts; they're edible art, transforming simple gelatin powder into something truly special. The vibrant palette available means you can customize them for any theme, holiday, or personal preference. Imagine a patriotic red, white, and blue mold for the Fourth of July, or a spooky green creation for Halloween. The possibilities are truly endless, making each jello mold recipe an opportunity to express your creativity.
Beyond Basic Gelatin: A Spectrum of Creations
When we talk about a jello mold recipe, we’re not just talking about plain, set gelatin. The world of Jello molds is incredibly diverse. Some recipes create luscious, creamy confections, often incorporating ingredients like sweetened condensed milk, cream cheese, or whipped cream for a richer, opaque texture. Others embrace the beauty of transparency, layering different colors and flavors to create stunning visual effects. You can fold in fresh or canned fruit (ensure it's not pineapple or kiwi, as their enzymes prevent gelatin from setting!), nuts, or even mini marshmallows to add extra texture and taste.
And while "Jell-O" is a popular brand, remember that any brand of gelatin will work for these recipes. Gelatin is gelatin, and its setting properties are generally consistent across brands, allowing you to choose your favorite flavors and colors without worry. The key is understanding the fundamentals of working with gelatin, which we'll explore next.
Crafting the Perfect Jello Mold: Tips for Success
Creating a show-stopping Jello mold is less about intricate skills and more about patience and a few clever techniques. Here’s how to ensure your wobbly masterpiece comes out perfectly every time:
- Grease Your Mold Lightly: A crucial first step often overlooked! Lightly grease your Bundt pan or mold with a neutral-flavored oil spray. This creates a thin barrier that will make unmolding a breeze, preventing your beautiful creation from sticking.
- Dissolve Gelatin Thoroughly: For a smooth, lump-free mold, always whisk your gelatin vigorously into boiling water for at least 2 full minutes. Ensure every granule is dissolved before adding cold water. Undissolved granules can lead to a gritty texture or uneven setting.
- Chill Times are Critical: Patience is truly a virtue when making layered Jello molds. Each layer needs to be completely set and firm to the touch before you pour the next. Rushing this step will result in blurred, muddy layers. Typically, 20-30 minutes per layer in the refrigerator is sufficient, but trust your touch test.
- The Warm Water Bath for Unmolding: This is the secret to a clean release. Briefly dip the bottom of your mold into a bowl of warm (not hot!) water for about 10-15 seconds. This gently loosens the edges without melting the entire mold. Then, place a serving plate upside down over the mold, invert, and gently shake or wiggle to release. If it doesn't come out immediately, repeat the warm water dip briefly.
- Don't Boil Unflavored Gelatin Mixtures: When dissolving unflavored gelatin in milk or other liquids for creamy layers, heat gently over low heat and stir constantly until dissolved. Boiling can degrade the gelatin's setting power.
Spotlight Recipe: The Stunning Rainbow Layered Jello Mold
Few desserts capture the imagination quite like the Master Rainbow Jello Molds: Easy Steps for Stunning Desserts. This vibrant, wobbly dessert is a nostalgic showstopper that’s surprisingly simple to build, offering layer upon colorful layer for a dazzling visual treat. It’s perfect for birthdays, holidays, or any event needing a burst of joy!
Yields: 12 servings
Prep time: 45 minutes (active)
Chill time: Minimum 4 hours, preferably overnight
Ingredients:
- 6 (3-ounce) packages of assorted flavored gelatin (e.g., strawberry, orange, lemon, lime, blue raspberry, grape)
- 4 cups boiling water, divided
- 4 cups cold water, divided
- 1 (14-ounce) can sweetened condensed milk
- 2 envelopes unflavored powdered gelatin
- 1 cup cold whole milk
Instructions:
- Prepare Your Mold: Lightly grease a 12-cup Bundt pan with a neutral-flavored oil spray to guarantee an easy release when unmolding. This small step makes a huge difference!
- First Colored Layer: Choose your first colored gelatin package. In a medium heatproof bowl, dissolve one package of flavored gelatin in 1 cup of boiling water, whisking vigorously for a full 2 minutes until all granules are completely dissolved.
- Cool the Gelatin: Stir 1 cup of cold water into the dissolved gelatin mixture until fully incorporated.
- Pour First Layer: Carefully pour this cooled, colored liquid into your prepared Bundt pan, gently tilting the pan to ensure it coats the bottom evenly.
- Chill First Layer: Refrigerate the pan for 25–30 minutes, or until the layer is fully set and firm to a light touch. This is critical for distinct layers.
- Prepare White Layer Base: While the colored layer chills, prepare your creamy white separator. Sprinkle 1 envelope of unflavored gelatin over 1/2 cup of cold whole milk in a small saucepan. Let it "bloom" or soften for about 5 minutes.
- Dissolve Unflavored Gelatin: Gently heat the milk and gelatin mixture over low heat, stirring constantly for 3–4 minutes until the gelatin is completely dissolved and the liquid appears clear. Do not let it boil.
- Create Creamy White Mixture: Whisk the warm gelatin mixture into the can of sweetened condensed milk until smooth and homogenous. Stir in the remaining 1/2 cup of cold whole milk.
- Add White Layer: Once your first colored layer is set, slowly pour about 3/4 cup of the white mixture over it to create a thin, even separator.
- Chill White Layer: Return the pan to the refrigerator and chill for 20–25 minutes, until this white layer is firm and set.
- Repeat & Layer: Repeat steps 2–5 and 9–10 with the remaining flavored gelatin packages and white mixture. Alternate colors and white layers until all six colors are used, always ending with a colored layer on top. Consistency in chilling each layer is key!
- Final Chill: After adding the final layer, cover the pan tightly with plastic wrap and refrigerate for at least 4 hours, or preferably overnight, to allow the entire mold to set completely and firm up.
- Unmold: To release your magnificent creation, briefly dip the bottom of the Bundt pan in a bowl of warm water for 10–15 seconds to loosen the edges. Place a large serving plate upside-down over the mold, then confidently invert the pan. Gently shake or wiggle it until the Jello mold releases onto the plate.
- Serve: Slice and serve your breathtaking Rainbow Layered Jello Mold, watching faces light up with joy!
Modernizing Classic Jello Molds: Fresh Ideas for Today's Table
While the classics are beloved, there's always room for innovation. Modernizing a jello mold recipe can mean playing with new flavor combinations, incorporating fresh ingredients, or even adapting presentations. Consider using less common fruit flavors like guava or elderflower for a sophisticated twist, or infuse your boiling water with herbs like mint or basil for an unexpected aromatic note. You can create individual mini-molds in cupcake liners or small ramekins for elegant single servings, perfect for a dinner party.
For those seeking healthier options, natural fruit juices can replace some of the water, and sugar-free gelatin varieties are widely available. You can also explore creative garnishes like fresh berries, whipped cream, or a dusting of zest to elevate the presentation. Check out more Colorful Jello Mold Recipes: Brighten Any Party & Table for inspiration on making your next Jello creation truly shine.
Conclusion
The art of creating Jello molds is a delightful journey back to a simpler, more playful time, yet it remains relevant and exciting today. From their vibrant colors to their unique wiggly-jiggly texture, these desserts are an instant mood booster and a guaranteed conversation starter. Whether you choose to recreate a stunning Rainbow Layered Jello Mold or invent your own unique concoction, embracing a classic jello mold recipe promises fun, flavor, and a touch of nostalgic magic for everyone at your table. So, don't shy away – grab your gelatin, pick your favorite flavors, and get ready to jiggle your way to dessert perfection!
